Case Study- What It Actually Takes to Wire scheel-mann Vario F Seats Into a 2003–2007 LX470 (and LC100)
- Services @ TS

- Jul 21
- 12 min read
A case study from Alexander Zesch's 2006 Lexus LX470

When Alexander reached out about putting scheel-mann Vario F Klima seats into his 2006 LX470, the first thing we told him was that the wiring on these trucks is more involved than any 100 Series Land Cruiser seat swaps. Not because it's complicated in a scary way, but because Toyota packed a lot of overlapping safety systems under those seats, treated the Land Cruiser and the LX470 differently, and every one of them needs to be accounted for before you button things back up. Its the way we just prefer to do things.
This article walks through how we handled Alexander's build: what we found, what needed to be fabricated, and how we solved the one piece that doesn't have a clean off-OUR-shelf answer yet.
Before You Pull Anything
The 2003–2007 Land Cruiser 100 Series and Lexus LX470 are largely the same vehicle under the floor, but there's a split year you need to know about. Some 2002 trucks use an earlier floor harness connector style; others already have the later type. If your truck is a 2002, you need to photograph the main floor connector before ordering anything from us - the two versions are not interchangeable.
2003 through 2007 are consistent EXCEPT the LX470s were given an added seat memory function that the LC100s did not get. Alexander's LX was a 2006, so we were working with new territory.
What's Actually Under the Seats
Before we get into the case study, here's a video of what Toyota put under each seat on these trucks for the 100 Series Land Cruiser and why it matters when you're swapping to aftermarket seats (the Lexus LX470 specifically is very similar but does add a seat memory computer):
Driver side: The driver's side floor harness feeds two main systems. The first is seat heat and power motors, which we'll get to. The second is the SRS circuit, which has three components: the seatbelt buckle connector, the airbag proxy (which replaces the squib circuit from the OEM seat), and the driver occupancy sensor: a U-shaped hall-effect device that mounts to the factory seat rail and reads a magnet to confirm the driver's seat is not too close to the steering wheel. Without all three functioning correctly, you get an airbag warning light that won't go away.
Passenger side: The passenger side has the same seatbelt and SRS requirements, with one addition: the passenger OCS pressure pad. This is a printed circuit embedded in the seat cushion foam, sealed in plastic, that tells the SRS computer whether someone is sitting in the seat and what weight class the occupant is to determine airbag force. There is no aftermarket replacement. It has to come out of the OEM seat and go into the replacement seat. Varying ohm values and connector types make substituting unlikely.
Seat heater: On 2003–2007 LX470s with the memory seat package - which Alexander's LX470 had - the seat heater circuit and power motor circuits don't run directly from the floor harness to the seat elements (opposite from the LC100 version). It runs through a dedicated PCB mounted under the seat that interprets the center console switch signals and controls the heating elements accordingly and/or the seat position switches and adjusts the seat accordingly. That computer is worth understanding before you touch anything, because it's the most nuanced part of the wiring on these trucks.
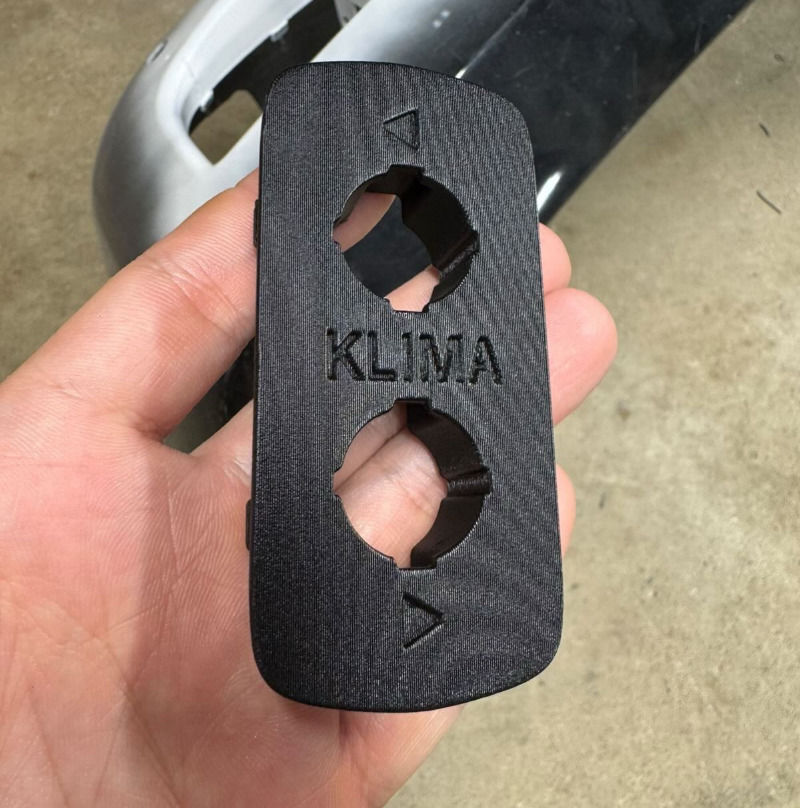
Klima switch panel: With seat heat handled through the OEM center console switches, Alexander still needed a mounting solution for the two Klima ventilation switches on the scheel-mann Vario F Klima seats. The 100 Series doesn't have an obvious home for aftermarket switches. We referred him to Ben of Ben3D Build (Instagram: @ben3dbuild), a 3D product developer who specializes in the 100 Series platform. Ben used the AHC (Active Height Control) pocket to design and print a dual switch panel that houses both Klima vent switches cleanly in an existing dash opening.
The Passenger Side First: Simpler in One Respect
We'll start with the passenger side because the wiring path is more straightforward even if it has more pieces.

The main floor connector on the passenger side is a large 10-pin white rectangular plug that comes up from the carpet. It handles seat heat signals and the motor circuits. On Alexander's truck, this is where the harness we build removes the two motor circuits (constant hot) and terminates the other end for the heater circuits (ignition hot). NOTE: yes that constant hot circuit could potentially be used for some aftermarket usage for the clever end-user but they need to know what they are doing electrically.
The seatbelt buckle on the passenger side is worth understanding in detail. It's not just a buckle, it's a wiring assembly. The buckle connector feeds into a 5-pin grey connector that goes to the floor harness. Separately, a 2-pin connector from the buckle assembly routes to the OCS pressure pad as part of a complete circuit. When Alexander sent us his OEM buckle assembly from the passenger side it turns out we didn't need to do anything to it except for wrapping the exposed wires. This harness's 5-pin connector plugs right into the floor harness and the 2-pin connector eventually to the pressure pad that now resides in his new scheel-mann Vario F Klima seat.

The OCS pressure pad itself is the piece that requires the most planning in a custom seat order like Alexander's. Because his seats were pre-assembled in Germany, we couldn't pre-install the pad on our end so instead they were installed by scheel-mann USA in Portland, Oregon before being shipped out. The solution was to have Alexander remove the pad from his OEM passenger seat foam (along with all the other harnesses) before the new seats shipped, then send it to us so we could include it in the kit with installation instructions to Portland.

Removing the pressure pad from the OEM seat is easier than it sounds. The pad is adhered to the foam but not bonded into it - careful work with a plastic pry tool gets it free without damage. Installation into the scheel-mann Vario F seat bottom follows the same process in reverse. If you want the detailed walk-through on that procedure, we have a full article on it here: The Toyota OCS Pressure Pad. The pressure pad photographed in that article is Alexander's, pulled from this exact build.
The Driver Side: The SRS Proximity Sensor Problem
The driver's side wiring has the same main floor 10-pin connector and seatbelt circuit, but the issue we see come up most often on these trucks is the driver occupancy sensor.
This sensor is a small U-shaped hall effect device. It reads a magnet mounted on a target bracket and signals the SRS computer that a driver seat is a safe distance from the steering wheel airbag. When the OEM seat comes out and a new seat goes in, that sensor has to go with it, properly mounted, with ferrous steel positioned in the center of the magnet field, or else you get the airbag light taunting you constantly.
Here's where most DIY and shop installations fail: the sensor gets unplugged from the old seat, set to the side, and then either forgotten or loosely tucked under the new seat with its connector plugged back in but the sensor itself floating free. From the SRS computer's perspective, a floating sensor with no magnetic target is the same as no sensor at all. The airbag light comes on. Usually intermittently at first because maybe it was plugged in but tucked away.


Now, here's the LX/100 Series-specific wrinkle: the sensor bracket we build for every other Toyota platform doesn't fit the 100 Series without modification, because the 100's hall-effect geometry is a mirror image of everything else in the Toyota lineup. On Alexander's install, we had to take the standard bracket tab and bend it 180º to get the sensor oriented correctly. It works, and it's exactly what we did for this build. Future 100 Series kits will include a dedicated bracket bent specifically for this geometry so that modification is no longer a field step.
The Driver Side Seatbelt Assembly
Before Alexander shipped anything to us, we had him harvest the driver side seatbelt assembly in one piece from the seat. This is the wiring run that handles both the seatbelt buckle signal and the driver position sensor, terminating in the grey 5-pin connector that plugs into the floor harness.

Alexander held onto the full harness assembly so he could keep his truck drivable while his new seats were in transit from Portland. What he sent separately was the driver position sensor itself, which gave us what we needed to sort out the bracket geometry and confirm the 180º tab bend required for the 100 Series mounting orientation. All we did is take our driver position sensor mount, put it in a vice, and bent the tab the other direction. Easy peasy.
The Seat Memory ECU: What It Is and Why It Matters
This is where the 2003–2007 Lexus LX470 trucks with the memory seat package diverge from everything else in the Toyota lineup, including the LC100 Series, and it's the part of this build that took the most investigating.
Under the driver's seat sits a dedicated seat position memory and heater control computer - a full PCB inside a grey plastic housing, held to the seat frame with screws. This computer is the intermediary between the seat heater switches/seat heating elements and seat memory switches/seat motors. The switches send a signal to the ECU; the ECU controls the elements and/or motors. Without it, or without accounting for it, the factory heater switches do nothing when trying to repurpose them with scheel-mann seats.

The connector to the ECU housing that mates to the 10-pin floor harness is the same connector as the passenger side. Here's the thing about that connector: we haven't been able to find it as a standalone housing anywhere in the Toyota, Yazaki, or Sumitomo ecosystem. And since the scheel-mann seats don't have motors - the position memory function goes away with the new seat - the ECU itself isn't needed once the seat is swapped. What is needed is a way to connect the floor harness heater signals to the scheel-mann seat elements so that the factory seat heaters function the way you expect them to.
That gives us two paths, and which one makes sense depends on the customer's situation.
Option 1: Send us the ECU
If you can remove the seat memory computer and send it to us, we extract the connector housing from it and use that as the basis of the new harness. The connector that mates to the floor harness came out of that ECU - it's the perfect fit by definition. From there, the harness runs out to the two 2-pin connectors that feed the scheel-mann seat heater elements.


Option 2: Three-wire bypass
If sending the ECU isn't practical, there's a simpler path, but it requires understanding how the factory switch circuit actually works.
The OEM seat heater switch doesn't simply switch power on and off. It controls heat level by changing the circuit configuration: LO runs the heater elements in series (higher combined resistance, less current, less heat), and HI switches them to parallel (lower resistance, more current, more heat). What that means at the floor connector is that both of those relevant pins shown above are hot leads; there's no dedicated ground pin in that signal pair but it is the in the connector but we removed it based on 3000 mile armchair data. Doh! This is what we did to make it work:

The solution: both remaining pins from the floor connector are spliced together into a single hot lead feeding the scheel-mann heater elements. The heater grounds are combined and terminated in a ring terminal for chassis grounding. The factory switches still control the seat heat.
The cleaner version of this harness pulls ground directly from the floor connector, which eliminates the ring terminal. The harness shown in Alexander's build uses a chassis ground instead, which is functionally identical but requires finding a grounding point under the seat.
This option works well for customers who are doing their own install and want to handle the wiring on their end, or for cases where the ECU is needed when putting the seats up on EBay.
The result in both cases is that the factory center-console heater switches continue to control the seat heat in the scheel-mann seats exactly as they did with the OEM seats. No aftermarket switches (for the heat anyway), no tap-in relay workarounds.
What Alexander Shipped Us, and What We Shipped Back
To put a finer point on the logistics of a build like this: here's the complete picture of what changed hands.
Alexander shipped us his passenger seatbelt assembly, his OCS pressure pad removed from the OEM seat foam, and his seat memory ECU and all the harnesses except for the driver seatbelt/position sensor harness. That gave us everything we needed to verify the connector types, build the passenger harness correctly, build the driver heater harness using the ECU connector, and include the pressure pad in the new seat.
We supply the airbag proxies for both sides, staged the driver occupancy sensor with the modified bracket, and built all harnesses.

What Alexander receives is a complete installation kit: scheel-mann Vario F Klima seats, seat mounts, the driver heater harness, airbag proxies for both sides, the driver occupancy sensor and modified bracket, the passenger harness, the pressure pad pre-installed, and the passenger seatbelt assembly (which technically we really didn't need).
Completed Install Photo
Alexander's finished install in his 2006 LX470. Both scheel-mann Vario F Klima seats fitted and wired. Grey fabric with black leather bolsters. OEM center console and armrest retained.

Closing
The later 100 Series and LX470 have a reputation for being difficult to wire correctly when swapping to aftermarket seats, and that reputation is earned. Between the seat memory ECU, the OCS pressure pad, the driver occupancy sensor geometry, and the Klima switch placement, there are more moving parts on this platform than almost anything else in the Toyota lineup. Alexander's build demonstrates that every one of those problems has a clean solution. The OEM heater switches still control seat heat. No airbag lights. The pressure pad transferred and lives in the new seat. The Klima switches have a proper home in the console. The result functions like it came from the factory this way, because every system that Toyota put under those seats was accounted for before anything was buttoned back up. That's the standard.
What You Need to Know Before Starting
If you're working through your own 100 Series or LX470 install - whether you bought a kit from us or you're figuring it out yourself - a few things are worth noting:
• Both seats need an airbag proxy.
• The driver occupancy sensor has to be mounted (product coming soon), not just plugged in. It needs to be bolted to the seat bracket with the ferrous target correctly positioned in the magnet field. A floating sensor is worse than no sensor because it makes diagnosis harder.
• The passenger pressure pad has to come out of the OEM seat and go into the new seat. There is no substitute. If someone already removed your OEM seats before you bought the truck and the pad is gone, you need to source it from a parted-out truck of the same year range.
• Assuming your LX470 has the seat memory ECU under the driver seat, you have two options for the heater harness: send us the ECU, or do a three-wire bypass at the floor connector. Either works. Contact us before ordering and we'll walk you through which path makes sense for your situation.
• The 2003–2007 heater harness(es) are not the same as the 1998–2002 harness. They are not interchangeable.


Comments